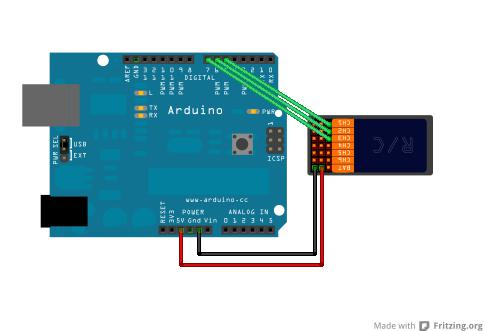
มีน้องๆ เคยฝากถามผมเรื่องเอามีวิธีเอารีโมต มาใช้กับ arduino ไหม ซึ่งผมเห็นว่ามีประโยชน์ดีครับ เลยเอาข้อมูลมา share กัน โดยเรื่องนี้ผมเอามาจาก tutorial ของ sparkfun ชื่อ RC Hobby Controllers and Arduino ซึ่งพยายามรวบรวมมาให้อ่านแบบง่ายๆ
สำหรับรีโมตที่ผมหมายถึงนี้คือ รีโมตวิทยุของเครื่องบินบังคับ ซึ่งตอนนี้ ราคาถูกลงมาเยอะ ผมเพิ่งซื้อมาจากร้าน RC ข้างที่พัก ในราคา พันกว่าๆ คุณภาพไม่ทราบนะครับ ผมยังไม่เคยจับของแพง แต่ใช้งานได้ล่ะ

เจ้ารีโมตนี้เอาไปทำอะไรได้บ้าง สิ่งที่ผมนึกออก คงเอาไปยังคับหุ่นยนต์ ผมจำได้สิ่งที่ทำอันดับแรก ตอนทำหุ่นยนต์ คือหาอุปกรณ์ควบคุมระยะไกล บังคับหุ่นยนต์ ซึ่งเคยตั้งแต่เปลี่ยนคอมพิวเตอร์กับ joystick ให้เป็นรีโมต ,ทำรีโมตดูง่ายๆ จากสวิทต์กดง่ายๆ ผมว่าถ้าทำหุ่นยนต์เล่นๆ ไม่ได้ลงแข่ง และ ไม่มีกติกาบังคับว่าห้ามใช้รีโมต นี้เป็นไอเดียที่น่าสนใจ มันส่งได้ไกล เสถียร และราคาถูกดีครับ
สำหรับ รีโมตเครื่องบินบังคับ จะมาพร้อมกับกล่อง Reciver ครับ ซึ่งตามปกติ มันเอาไว้ควบคุมมอเตอร์ RC-Servo อยู่แล้ว ดังนั้นเหมือนมีการดันคันบังคับ ตัว reciver จะแปลงค่าองศาที่ดันคันบังคับให้เป็น pulse เพื่อเอาไปควบคุมมอเตอร์ RC อีกที่ ดังนั้น ถ้าเราจะเอารีโมตเครื่องบินบังคับไปใช้ เราหาทางอ่านค่าความกว้าง pulse ให้ได้

สำหรับ arduino จะมีฟังก์ชั้นพิเศษชื่อ PulseIn มันสามารถใช้อ่านค่า Pulse จาก Reciver ได้เลย ซึ่งโค๊ดตามตัวอย่างข้างล่างนี้ ซึ่งเราสามารถเอาค่าที่ได้ มาปรับแต่งให้ใช้งานกับหุ่นยนต์ได้ ข้อดีของรีโมตพวกนี้ มันใช่ได้แค่ ค่าเปิดปิด แต่มันได้ค่าเป็นแบบ analog มีปริมาณออกมาด้วย ไม่ใช่แค่เปิด ปิด ดังตัวอย่าง
/*

/*
 RC PulseIn Serial Read out
 By: Nick Poole
 SparkFun Electronics
 Date: 5
 License: CC-BY SA 3.0 - Creative commons share-alike 3.0
 use this code however you'd like, just keep this license and
 attribute. Let me know if you make hugely, awesome, great changes.
 */

int ch1; // Here's where we'll keep our channel values
int ch2;
int ch3;

void setup() {

  pinMode(5, INPUT); // Set our input pins as such
  pinMode(6, INPUT);
  pinMode(7, INPUT);

  Serial.begin(9600); // Pour a bowl of Serial

}

void loop() {

  ch1 = pulseIn(5, HIGH, 25000); // Read the pulse width of
  ch2 = pulseIn(6, HIGH, 25000); // each channel
  ch3 = pulseIn(7, HIGH, 25000);

  Serial.print("Channel 1:"); // Print the value of
  Serial.println(ch1);        // each channel

  Serial.print("Channel 2:");
  Serial.println(ch2);

  Serial.print("Channel 3:");
  Serial.println(ch3);

  delay(100); // I put this here just to make the terminal
              // window happier
}
จากการทดลอง pulseIn จะส่งค่าความกว้างของ pulse ออกมา หน่วยเป็น millisec ซึ่งมันจะอยู่ในช่วง 1,000 ถึง 2,000 ครับ ซึ่งค่ากลางของมันจะอยู่ที่ 1,500 หรือใกล้ๆเคียงนี้ล่ะ ค่าได้ที่ออกมา เรายังเอาไปใช้งานในโปรแกรมยากอยู่ ซึ่งเราสามารถแปลงให้อยู่ในช่วง -500 ถึง 500 ได้ด้วยวิธีนี้ครับ เพิ่มคำสั่ง map(ch3, 1000,2000,-500,500) ซึ่งมันจะ map ตัวเลขในช่วง 1000 ถึง 2000 ให้อยู่ในช่วง -500 ถึง 500 ด้วยคำสั้งเดียว (จะแสนสบายไปไหน)
/*
 RC PulseIn Joystick
 By: Nick Poole
 SparkFun Electronics
 Date: 5
 License: CC-BY SA 3.0 - Creative commons share-alike 3.0
 use this code however you'd like, just keep this license and
 attribute. Let me know if you make hugely, awesome, great changes.
 */

int ch1; // Here's where we'll keep our channel values
int ch2;
int ch3;

void setup() {

pinMode(5, INPUT); // Set our input pins as such
pinMode(6, INPUT);
pinMode(7, INPUT);

Serial.begin(9600); // Pour a bowl of Serial

}

void loop() {

  ch1 = pulseIn(5, HIGH, 25000); // Read the pulse width of
  ch2 = pulseIn(6, HIGH, 25000); // each channel
  ch3 = pulseIn(7, HIGH, 25000);

  if(ch1>1000){Serial.println("Left Switch: Engaged");}
  if(ch1<1000){Serial.println("Left Switch: Disengaged");}
  /* I found that Ch1 was my left switch and that it
  floats around 900 in the off position and jumps to
  around 1100 in the on position */

Serial.print("Right Stick X:"); // Ch3 was x-axis
Serial.println(map(ch3, 1000,2000,-500,500)); // center at 0

Serial.print("Right Stick Y:"); // Ch2 was y-axis
Serial.println(map(ch2, 1000,2000,-500,500)); // center at 0

Serial.println(); //make some room

delay(100);// I put this here just to make the terminal
           // window happier
}
แค่นี้เราสามารถเอาค่ารีโมตมาใช้งานได้แล้ว ซึ่งความจริงเรื่องนี้ยังมีอธิบายต่ออีก เอาไปทำหุ่นยนต์บังคับง่ายๆได้ แต่สำหรับตอนนี้ผมว่า เอาแค่ไอเดีย กับ concept พอก่อน ส่วนการประยุกต์ที่เหลือต้องลองเองล่ะ
แชร์ประสบการณ์นิดหนึ่ง รีโมตปกติที่มีขายกันนิ จะมีค่าเพี้ยนไม่เหมือนกันบ้างครับ ก็ได้มา ปรับจูนนิดหน่อยครับ
สำหรับใครสนใจ อยากอ่านเพิ่มเติม หาอ่านได้ที่นี้ครับ RC Hobby Controllers and Arduino จาก sparkfun

การอ่านค่าจากรีซีฟแบบนี้มันจะทำให้ลูปรันช้า ถ้าจะให้ดีต้องใช้ interrupt
ขอบคุณครับ สำหรับคำแนะนำ
ผมใช้ interupt จะทำงานได้แค่ 2 ช่องใช่ป่าว
ขอทราบรายละเอียด บอร์ด freeduino และราคาด้วย มือใหม่จริง ๆ ขอบคุณครับ
เคยลองเอามาเล่นแล้วครับ สนุกดีเหมือนกัน (ลองกับหุ่นยนต์กู้ภัยด้วย) แต่บางครั้งใช้ไปนานๆ สัญญาณรบกวนจนต้องเปลี่ยนค่าไป-มา อยู่เรื่อย
อย่างมากก็เอาค่าพัลส์ที่ได้ไปควบคุมมอเตอร์ให้ช้า-เร็วได้ตามต้องการ
ทำให้รถเคลื่อนที่อัตโนมัติด้วยบอร์ดardrunioได้ไหมครับ