
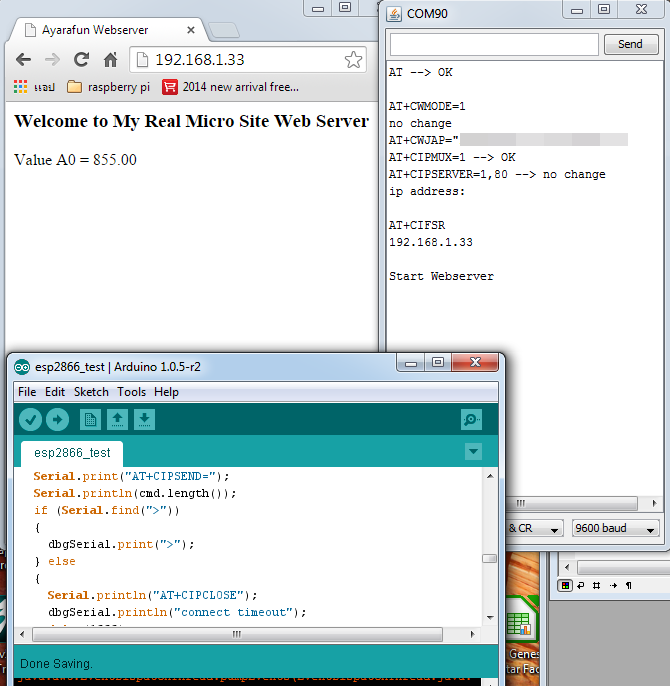
วันนี้ทางผมเอาตัวอย่างการใช้งาน #ESP8266 กับ สร้าง Wifi Web Server แบบราคา super สุดคุ้ม เป็นตัวอย่าง Web Site ง่ายๆ นะครับ ใครเอาใช้ ใครเอาขายไม่แบ่งเงิน แล้วมัน Hang อย่าพึงบ่นนะครับ
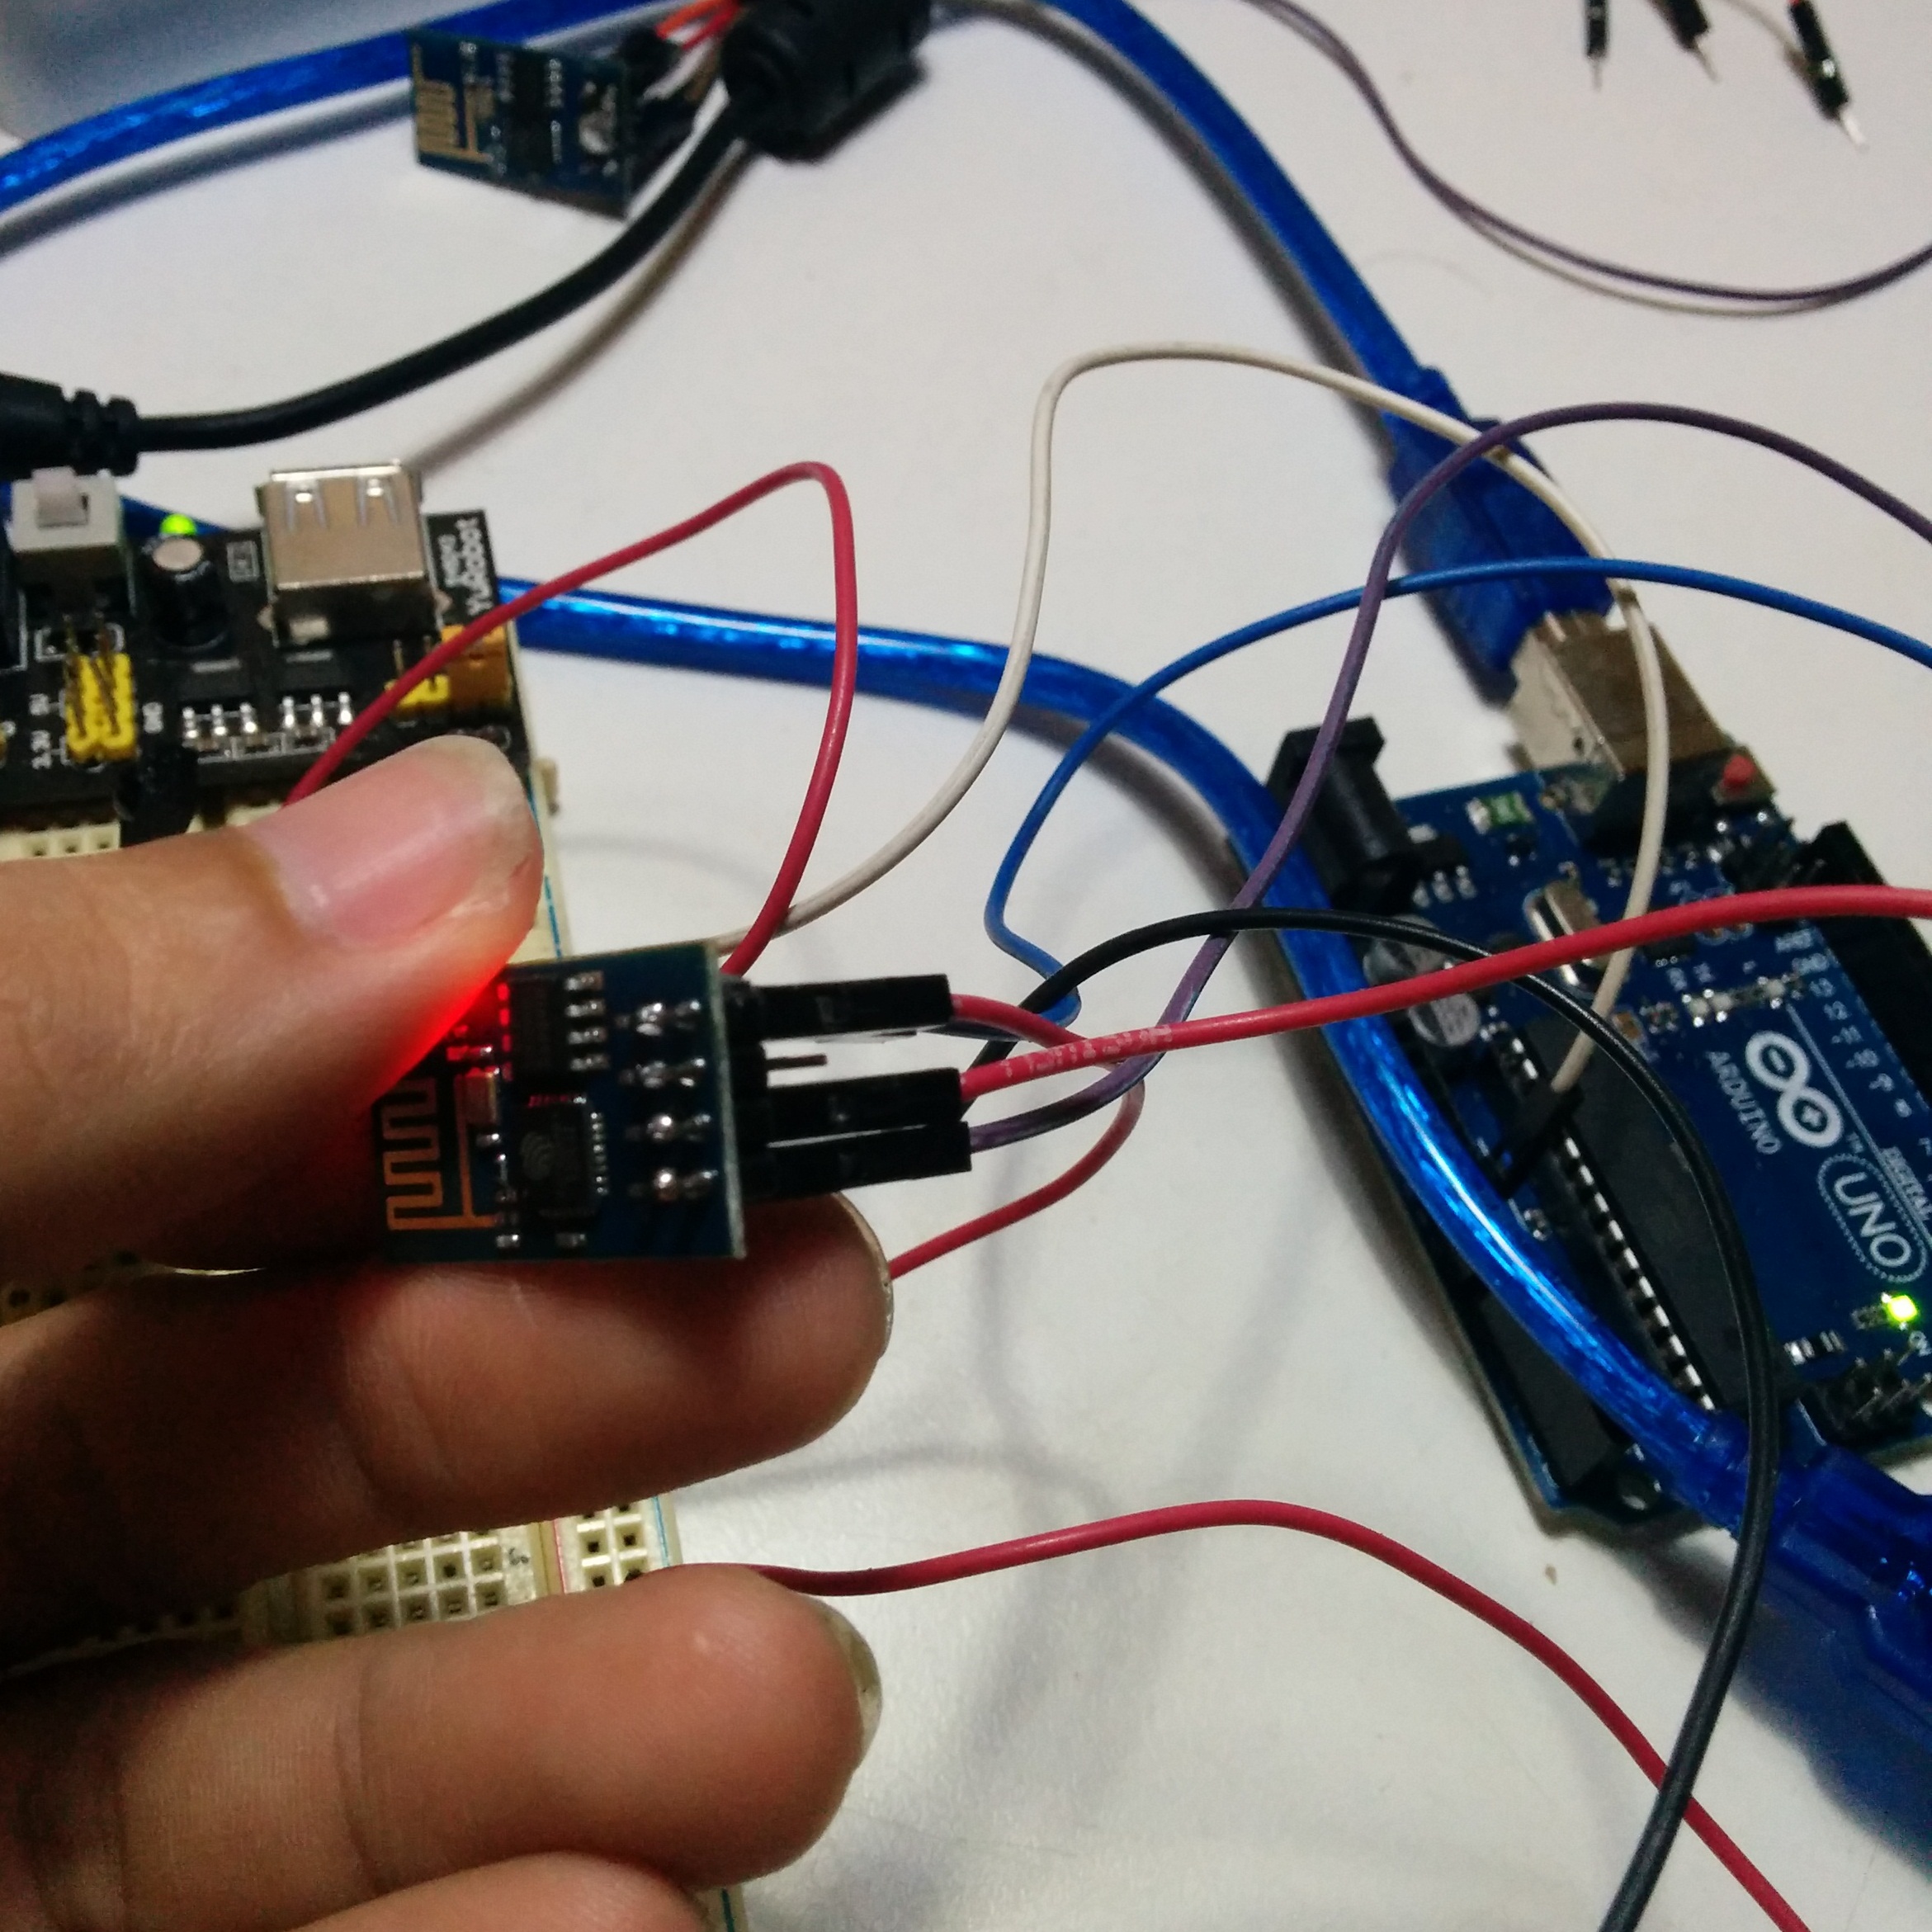
วงจร ต่อประมาณนี้ครับ แต่ที่เพิ่มไป คือ ต่อ VR ที่ A0 สำหรับ อ่านค่า
<img class="wp-image-6330 size-medium" src="http://www.ayarafun.com/wp-content/uploads/2014/09/IMG_20140928_123145-300×300.jpg" alt="ต่อเพียง 5 สาย ทำงานได้" width="300" height="300" srcset="http://www.ayarafun viagra prix en tunisie.com/wp-content/uploads/2014/09/IMG_20140928_123145-300×300.jpg 300w, http://www.ayarafun.com/wp-content/uploads/2014/09/IMG_20140928_123145-150×150.jpg 150w, http://www.ayarafun.com/wp-content/uploads/2014/09/IMG_20140928_123145-1024×1024.jpg 1024w, http://www.ayarafun.com/wp-content/uploads/2014/09/IMG_20140928_123145-50×50.jpg 50w, http://www.ayarafun.com/wp-content/uploads/2014/09/IMG_20140928_123145-100×100.jpg 100w, http://www.ayarafun.com/wp-content/uploads/2014/09/IMG_20140928_123145-500×500.jpg 500w, http://www.ayarafun.com/wp-content/uploads/2014/09/IMG_20140928_123145-1000×1000.jpg 1000w, http://www.ayarafun.com/wp-content/uploads/2014/09/IMG_20140928_123145-120×120.jpg 120w” sizes=”(max-width: 300px) 100vw, 300px” />
ต่อเพียง 5 สาย ทำงานได้
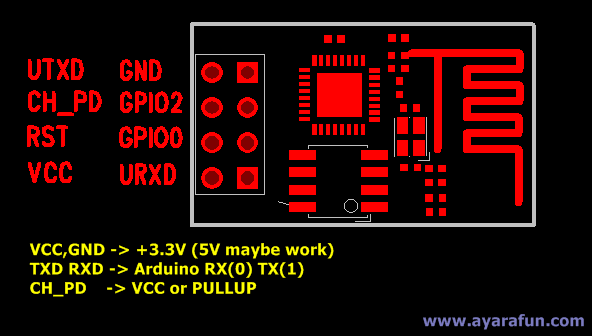
PINOUT
ตัวอย่างการทำ Web Server
#include <SoftwareSerial.h>
#define SSID  "ssssssssss"
#define PASS  "xxxxxxxxxx"

SoftwareSerial dbgSerial(10, 11); // RX, TX
void setup()
{
  // Open serial communications and wait for port to open:
  Serial.begin(115200);
  Serial.setTimeout(500);
  dbgSerial.begin(9600);  //can't be faster than 19200 for softserial


  //test if the module is ready
  sendAndWait( "AT","OK",10);

  //Change to mode 1
  //sendAndWait("AT+CWMODE=1","no change","OK",100);
  Serial.println("AT+CWMODE=1");
  delay(100);

  // connect to router
  connectWiFi(SSID,PASS);

  //set the multiple connection mode
  sendAndWait("AT+CIPMUX=1","OK",100);

  //set the server of port 80 check "no change" or "OK"
  sendAndWait("AT+CIPSERVER=1,80","no change",100);

  //print the ip addr
  dbgSerial.println("ip address:");
  Serial.println("AT+CIFSR");
  delay(100);
  while ( Serial.available() ) {
    dbgSerial.write(Serial.read());
  }
  dbgSerial.println();

  dbgSerial.println( "Start Webserver" );
}

void loop() {
  while (Serial.available() >0 )
  {
    char c = Serial.read();
    if (c == 71) {
      dbgSerial.println("Send Web Request");
      webserver();
      delay(500);
    }
  }
}

void http(String output)
{
  Serial.print("AT+CIPSEND=0,");
  Serial.println(output.length());
  if (Serial.find(">"))
  {
    //Serial.println(output);
    sendAndWait(output,"SEND OK",10);
  }
}

// Get the data from the WiFi module and send it to the debug serial port
boolean sendAndWait(String AT_Command, char *AT_Response, int wait){
  dbgSerial.print(AT_Command);
  Serial.println(AT_Command);
  delay(wait);
  while ( Serial.available() > 0 ) {
    if ( Serial.find(AT_Response)  ) {
        dbgSerial.print(" --> ");
        dbgSerial.println(AT_Response);
	return 1;
    }
  }
  dbgSerial.println(" fail!");
  return 0;
}

void webserver(void) {
 char temp1[10];
 dtostrf(analogRead(A0),1,2,temp1);
 http("<title>Ayarafun Webserver</title><H3>Welcome to My Real Micro Site Web Server</H3><p>Value A0 = "+ String(temp1) +"</p>");
 //delay(1000);
 sendAndWait("AT+CIPCLOSE=0","",500);
}
boolean connectWiFi(String NetworkSSID,String NetworkPASS)
{
  String cmd = "AT+CWJAP=\"";
  cmd += NetworkSSID;
  cmd += "\",\"";
  cmd += NetworkPASS;
  cmd += "\"";

  //dbgSerial.println(cmd);
  //sendAndWait(cmd,"OK",10);
  Serial.println(cmd);
  delay(100);
  while ( Serial.available() ) {
    dbgSerial.write(Serial.read());
  }
}
สบายละผม ก๊อปๆๆๆอย่างเดียว อิอิ
confirm step ตามนี้ครับ 🙂 ขอบคุณมาก
ต้องใช้ usb2serial ไหมครับ
หมายถึง Library ของ Arduino ใช้ไหมครับ ?
ผมทดสอบ AT command เท่านั้นครับ ไม่ได้ Programming ผ่าน Arduino
ผมใช้ Hardware ที่ต่อ USB UART .. เพื่อให้สามารถรับส่ง AT command ได้
ถ้าไม่อัปเดท firmware เวอร์ชั่น 0.9.2 จะได้ผลเหมือนกันมั้ยครับ ,ของผมเงียบสนิทเลย
ไม่ต้องนะครับ
โค้ดนี้ รีเฟช หน้าเว็บหรือเปล่าครับ หรือว่าส่งคำสั่งครั้งเดียวครับ
ขอบคุณครับ ที่แบ่งปันความรู้
ทำไมของผมไม่ได้ผลตามนี้ T-T
Where can I download all the files, and the electronic schematics for the wires.
Gino
Gino
now you can use esp8266 stand alone
use arduino with esp8266 is old method not stable
i will do a new tutorial , please waiting
I connected the wires as your description, and upload the code to my arduino platform.
And the arduino serial recieves only this message:
_______________________
AT+CIPMUX=1
AT+CIPSERVER=1,8888
AT+CIFSR
________________________
And if I turn my power on for my arduino uno and ESP8266 module then I see the acces point in my notebook and the name is AI-THINKER_54B8A.
If I upload the blank code to the arduino and then the acces point also works with the name AI-THINKER_54B8A.
What can I do to fix this problem.
Gino
Gino
This is how I connect the wires from te esp8266 to the arduino uno.
ของผมมันขึ้นแค่นี้อะคับไม่ยอมขยับอีกเลย
AT
AT+CWMODE=1
AT+CWJAP=”chean”,”123456789″
AT+CIPMUX=1
AT+CIPSERVER=1,80
AT+CIFSR
ต้องต่อโมดูล TTL — USB แล้วต่อกับขา 10,11 เพื่อมอนิเตอร์ดูถึงจะรู้สภาวะของบอร์ดครับเรียกว่ามีโปรแกรม ซีเรียลพอร์ทอีกตัวครับ ถึงเห็นสถานะครับ
SoftwareSerial dbgSerial(10, 11); // RX, TX
ทั้งๆที่ตั้งขาไว้แล้ว ทำไมให้ไปต่อ ขอ 0กับ ขา1 ด้วยครับ
ผมก็ก็สงสัยเหมือนกันแต่คิดว่า ขา 0 และ1เอาไว้set AT Command ของ ESP8266
ส่วน softwareserial ไว้ debugเพื่อให้รู้ว่า arduino ตอบสนองอะไรเพราะส่วนนี้
รับสัญญานมาทางwifi แล้วแสดงออกทาง Debugserial รอท่านอื่นชี้แนะ
ถ้าเราจะให้ esp8266 ส่งข้อมูลที่ได้จากการรับค่าที่เราตั้งไว้ ไปโชว์ในฐานข้อมูล
เราต้องทำยังไงคับ