

บทความนี้ เป็นบทความจุดประกายดีกว่า ไม่อยากจะบอกว่าสอนเขียนโปรแกรมใดๆ เอาว่าเป็นก้าวเดินเล็กๆ สำหรับ คนที่จะหัดเขียนโปรแกรมใช้งานบน Internet และ บนเน็ตเวิร์คไวไฟ (WiFi) กันนะครับ เพราะว่า มันก้าวกระโดดมาจาก Arduino ธรรมดามาพอสมควร ทั้งศัพท์ทางเน็ตเวิร์ค พวกโปรแกรมมิ่งอีก ใครที่มาจับ IoT ช่วงแรก งง แน่นอน
สำหรับบทความนี้ ใช้ได้กับ ทุกบอร์ด ในตระกุล ESP32 นะครับ แต่จะให้ดีใช้ Node32Lite ก้อแล้วกันครับ หลังจากที่ติดตั้ง ESP32 ไปแล้ว หากใครใจร้อนหน่อยลุยเล่นเองตาม Example ได้เลย สำหรับใครที่ไปถูก มาเริ่มตามทางเราก็ได้นะครับ
Simple Web Server
เวปเซิร์ฟเวอร์เป็นเซิร์ฟเวอร์แบบมี Request และ Response โดยหลักการเราเปิด TCP Server ในหมายเลข PORT 80 ก็สามารถทำ Server อย่างง่ายๆได้แล้ว โดยตัว ESP32 จะส่งค่า HTML ที่เป็นหน้าตาของเวปกลับไป และ Server จะรับคำสั่งผ่าน Request มาใช้เปิดปิด LED อีกด้วย
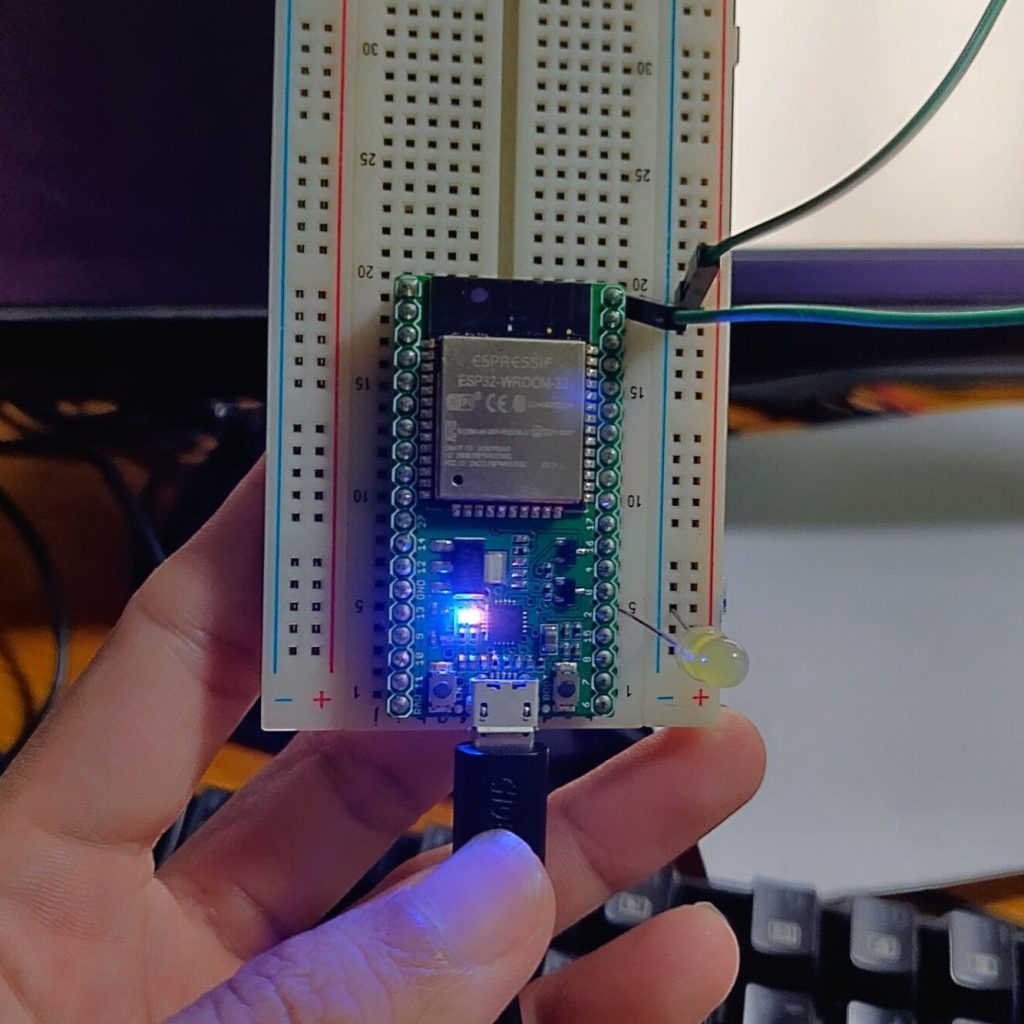
อุปกรณ์ ที่ต้องใช้ กับ วงจรง่ายๆ
ที่จริงแล้วเวปเซิร์ฟเวอร์ ตัวนี้ยังไม่สมบูรณ์ ค่อนข้างลักไก่นะครับ ;-D แต่ตัวอย่างนี้ทำให้เราเข้าใจหลักการของ HTTP Protocol และ การรับส่งข้อมูลของ Browser กับเวปเซิร์ฟเวอร์ ว่าสั่งง่ายๆแบบนี้ล่ะ ซึ่งในลำดับต่อไป จะเอา framework ที่น่าสนใจ ในการทำเวปเซิร์ฟเวอร์มาแนะนำอีกที่ ตอนนี้ หน้าเวปไม่ต้องสวยไปก่อนนะครับ
/*
 WiFi Web Server LED Blink

 A simple web server that lets you blink an LED via the web.
 This sketch will print the IP address of your WiFi Shield (once connected)
 to the Serial monitor. From there, you can open that address in a web browser
 to turn on and off the LED on pin 5.

 If the IP address of your shield is yourAddress:
 http://yourAddress/H turns the LED on
 http://yourAddress/L turns it off

 This example is written for a network using WPA encryption. For
 WEP or WPA, change the Wifi.begin() call accordingly.

 Circuit:
 * WiFi shield attached
 * LED attached to pin 5

 created for arduino 25 Nov 2012
 by Tom Igoe

ported for sparkfun esp32
31.01.2017 by Jan Hendrik Berlin

 */

#include <WiFi.h>

const char* ssid     = "ssidHere";
const char* password = "passHere";

#define ledPIN 2

WiFiServer server(80);

void setup()
{
    Serial.begin(115200);
    pinMode(ledPIN, OUTPUT);      // set the LED pin mode

    delay(10);

    // We start by connecting to a WiFi network

    Serial.println();
    Serial.println();
    Serial.print("Connecting to ");
    Serial.println(ssid);

    WiFi.begin(ssid, password);

    while (WiFi.status() != WL_CONNECTED) {
        delay(500);
        Serial.print(".");
    }

    Serial.println("");
    Serial.println("WiFi connected.");
    Serial.println("IP address: ");
    Serial.println(WiFi.localIP());

    server.begin();

}

int value = 0;

void loop(){
 WiFiClient client = server.available();   // listen for incoming clients

  if (client) {                             // if you get a client,
    Serial.println("New Client.");           // print a message out the serial port
    String currentLine = "";                // make a String to hold incoming data from the client
    while (client.connected()) {            // loop while the client's connected
      if (client.available()) {             // if there's bytes to read from the client,
        char c = client.read();             // read a byte, then
        Serial.write(c);                    // print it out the serial monitor
        if (c == '\n') {                    // if the byte is a newline character

          // if the current line is blank, you got two newline characters in a row.
          // that's the end of the client HTTP request, so send a response:
          if (currentLine.length() == 0) {
            // HTTP headers always start with a response code (e.g. HTTP/1.1 200 OK)
            // and a content-type so the client knows what's coming, then a blank line:
            client.println("HTTP/1.1 200 OK");
            client.println("Content-type:text/html");
            client.println();

            // the content of the HTTP response follows the header:
            client.print("Click <a href=\"/H\">here</a> to turn the LED on.<br>");
            client.print("Click <a href=\"/L\">here</a> to turn the LED off.<br>");

            // The HTTP response ends with another blank line:
            client.println();
            // break out of the while loop:
            break;
          } else {    // if you got a newline, then clear currentLine:
            currentLine = "";
          }
        } else if (c != '\r') {  // if you got anything else but a carriage return character,
          currentLine += c;      // add it to the end of the currentLine
        }

        // Check to see if the client request was "GET /H" or "GET /L":
        if (currentLine.endsWith("GET /H")) {
          digitalWrite(ledPIN, HIGH);               // GET /H turns the LED on
        }
        if (currentLine.endsWith("GET /L")) {
          digitalWrite(ledPIN, LOW);                // GET /L turns the LED off
        }
      }
    }
    // close the connection:
    client.stop();
    Serial.println("Client Disconnected.");
  }
}
อธิบายโค๊ด
ตั้งค่า ssid กับ password ให้ตรงกับเน็ทเวิร์ก ที่ใช้งานด้วยนะครับ โดยขอย้ำว่า ตัวเล็ก ตัวใหญ่ ช่องว่าง ขีดกลาง ต้องใส่ให้ครบครับ มีผล
const char* ssid     = "ssidHere";
const char* password = "passHere";
ทำการประกาศ WiFiServer server(80); เพื่อใช้คลาส WiFiServer ซึ่งเป็น TCP Server เปิด พอร์ตไว้ที่ 80
WiFiServer server(80);
Setup()
ใน setup() เราจะกำหนดค่าเริ่มต้น เราต้องสั่งให้ esp32 เชื่อมต่อกับ SSID โดยผ่านคำสั่ง WiFi.begin(ssid, password); และ ตรวจสอบ WiFi.status() จนกระทั่งโมดุลมีการเชื่อมต่อสมบูรณ์
WiFi.begin(ssid, password);

while (WiFi.status() != WL_CONNECTED) {
  delay(500);
  Serial.print(".");
}
จากนั้นเริ่มต้นใช้งาน TCP Server ด้วยคำสั่ง Server.begin()
server.begin();
Loop()
ใน loop() เราโปรแกรมสิ่งที่จะเกิดขึ้นเมื่อมี client ใหม่เข้ามาเชื่อมต่อกับเวปเซิร์ฟเวอร์
โดยใน ESP32 จะรอการเชื่อมต่อ ผ่านบรรทัดนี้
WiFiClient client = server.available(); // listen for incoming clients
และเมือมีการ Request จาก Client หรือในที่นี้คือ Browser เราจะบันทึกค่าไว้ในตัวแปร currentLine จนกระทั่ง มี newline เข้ามาจะทำการเริ่มบันทึกใหม่
เมื่อ currentLine หรือ ข้อมูล Request เข้ามา ตัว server ทำการส่ง Response กลับทั้นที่ ซึ่งแสดงในบรรทัด 12 ถึง 22 ซึ่งจะเป็นหน้า Page ที่เราเห็นใน Browser
if (client) {                             // if you get a client,
   Serial.println("New Client.");           // print a message out the serial port
   String currentLine = "";                // make a String to hold incoming data from the client
   while (client.connected()) {            // loop while the client's connected
     if (client.available()) {             // if there's bytes to read from the client,
       char c = client.read();             // read a byte, then
       Serial.write(c);                    // print it out the serial monitor
       if (c == '\n') {                    // if the byte is a newline character

         // if the current line is blank, you got two newline characters in a row.
         // that's the end of the client HTTP request, so send a response:
         if (currentLine.length() == 0) {
           // HTTP headers always start with a response code (e.g. HTTP/1.1 200 OK)
           // and a content-type so the client knows what's coming, then a blank line:
           client.println("HTTP/1.1 200 OK");
           client.println("Content-type:text/html");
           client.println();

           // the content of the HTTP response follows the header:
           client.print("Click <a href=\"/H\">here</a> to turn the LED on.<br>");
           client.print("Click <a href=\"/L\">here</a> to turn the LED off.<br>");

           // The HTTP response ends with another blank line:
           client.println();
           // break out of the while loop:
           break;
         } else {    // if you got a newline, then clear currentLine:
           currentLine = "";
         }
       } else if (c != '\r') {  // if you got anything else but a carriage return character,
         currentLine += c;      // add it to the end of the currentLine
       }

     }
   }
โดยถ้า currentLine มีคำสั่ง “GET /H” จะทำการเปิด LED และ ถ้า “GET /L” จะไปสั่งปิด LED ซึ่งคำสั่งนี้ มันได้มาจาก การคลิกหน้า page ที่เราสร้างขึ้นมาล่ะครับ
// Check to see if the client request was "GET /H" or "GET /L":
if (currentLine.endsWith("GET /H")) {
   digitalWrite(ledPIN, HIGH);               // GET /H turns the LED on
}
if (currentLine.endsWith("GET /L")) {
   digitalWrite(ledPIN, LOW);                // GET /L turns the LED off
}
ถึงตรงนี้ จะเห็นว่า หลักการเบื้องต้น มันง่ายมาก ใช่ไหมครับ
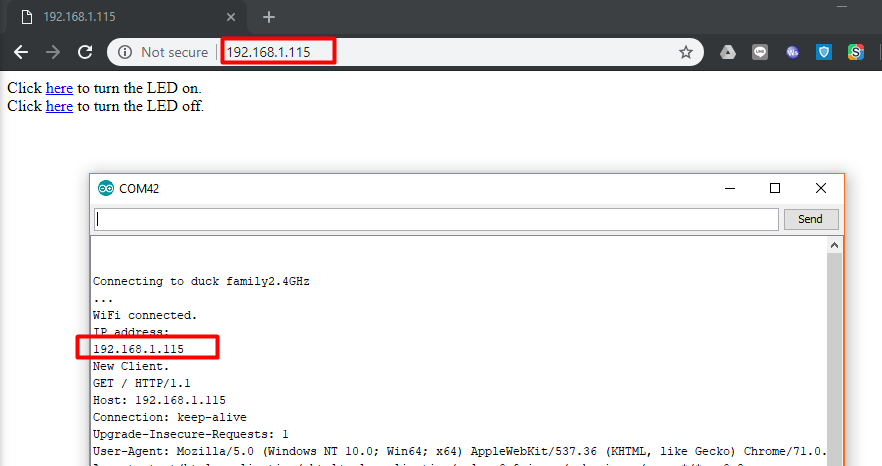
ผลลัพท์

ไฟกระพริบผ่าน Web
Static/FIX IP Address
ทุกครั้งที่มีการ Reboot ระบบเน็กเวิร์ก หมายเลข IP ESP32 อาจจะไม่ใช่หมายเลขเดิมครับ มันจะรันใหม่ทุกครั้งตาม DHCP ซึ่งผมจะแถมให้อีกนิด ถ้าเราจะ Fix IP หรือจะกำหนดไอพี จะทำอย่างไง
อันนี้ให้เอาตัวอย่างอันที่ 2 มาเพิ่มโค๊ดที่ Header ดังข้างล่าง
โดยเราจะกำหนดให้ ESP32 มี IP 192.168.1.115 เชื่อมต่อกับ Gateway IP 192.168.1.1
IPAddress local_IP(192, 168, 1, 115);
IPAddress gateway(192, 168, 1, 1);
IPAddress subnet(255, 255, 255, 0);
IPAddress primaryDNS(8, 8, 8, 8); //optional
IPAddress secondaryDNS(8, 8, 4, 4); //optional
หมายเลขดังกล่าวสามารถเปลี่ยนได้ และ อาจจะไม่เวิร์กกับ network ที่ท่านทดลองนะครับ อย่างไงลองศึกษาอีกนิด
Setup()
เราจะกำหนด fix ip ด้วยคำสั่ง WiFi.config()
// Configures static IP address
if (!WiFi.config(local_IP, gateway, subnet, primaryDNS, secondaryDNS)) {
  Serial.println("STA Failed to configure");
}
จากนั้นทุกอย่างจะเหมือนเดิม แค่ตอนนี้ จะ reset Network กี่รอบ ก็ยังได้ IP มาด้วย
/*
 WiFi Web Server LED Blink

 A simple web server that lets you blink an LED via the web.
 This sketch will print the IP address of your WiFi Shield (once connected)
 to the Serial monitor. From there, you can open that address in a web browser
 to turn on and off the LED on pin 5.

 If the IP address of your shield is yourAddress:
 http://yourAddress/H turns the LED on
 http://yourAddress/L turns it off

 This example is written for a network using WPA encryption. For
 WEP or WPA, change the Wifi.begin() call accordingly.

 Circuit:
 * WiFi shield attached
 * LED attached to pin 5

 created for arduino 25 Nov 2012
 by Tom Igoe

ported for sparkfun esp32
31.01.2017 by Jan Hendrik Berlin

 */

#include <WiFi.h>

const char* ssid     = "duck Family2.4GHz";
const char* password = "212224236";

IPAddress local_IP(192, 168, 1, 115);
IPAddress gateway(192, 168, 1, 1);
IPAddress subnet(255, 255, 0, 0);
IPAddress primaryDNS(8, 8, 8, 8); //optional
IPAddress secondaryDNS(8, 8, 4, 4); //optional

#define ledPIN 2

WiFiServer server(80);

void setup()
{
    Serial.begin(115200);

    if (!WiFi.config(local_IP, gateway, subnet, primaryDNS, secondaryDNS)) {
      Serial.println("STA Failed to configure");
    }

    pinMode(ledPIN, OUTPUT);      // set the LED pin mode

    delay(10);

    // We start by connecting to a WiFi network

    Serial.println();
    Serial.println();
    Serial.print("Connecting to ");
    Serial.println(ssid);

    WiFi.begin(ssid, password);

    while (WiFi.status() != WL_CONNECTED) {
        delay(500);
        Serial.print(".");
    }

    Serial.println("");
    Serial.println("WiFi connected.");
    Serial.println("IP address: ");
    Serial.println(WiFi.localIP());

    server.begin();

}

int value = 0;

void loop(){
 WiFiClient client = server.available();   // listen for incoming clients

  if (client) {                             // if you get a client,
    Serial.println("New Client.");           // print a message out the serial port
    String currentLine = "";                // make a String to hold incoming data from the client
    while (client.connected()) {            // loop while the client's connected
      if (client.available()) {             // if there's bytes to read from the client,
        char c = client.read();             // read a byte, then
        Serial.write(c);                    // print it out the serial monitor
        if (c == '\n') {                    // if the byte is a newline character

          // if the current line is blank, you got two newline characters in a row.
          // that's the end of the client HTTP request, so send a response:
          if (currentLine.length() == 0) {
            // HTTP headers always start with a response code (e.g. HTTP/1.1 200 OK)
            // and a content-type so the client knows what's coming, then a blank line:
            client.println("HTTP/1.1 200 OK");
            client.println("Content-type:text/html");
            client.println();

            // the content of the HTTP response follows the header:
            client.print("Click <a href=\"/H\">here</a> to turn the LED on.<br>");
            client.print("Click <a href=\"/L\">here</a> to turn the LED off.<br>");

            // The HTTP response ends with another blank line:
            client.println();
            // break out of the while loop:
            break;
          } else {    // if you got a newline, then clear currentLine:
            currentLine = "";
          }
        } else if (c != '\r') {  // if you got anything else but a carriage return character,
          currentLine += c;      // add it to the end of the currentLine
        }

        // Check to see if the client request was "GET /H" or "GET /L":
        if (currentLine.endsWith("GET /H")) {
          digitalWrite(ledPIN, HIGH);               // GET /H turns the LED on
        }
        if (currentLine.endsWith("GET /L")) {
          digitalWrite(ledPIN, LOW);                // GET /L turns the LED off
        }
      }
    }
    // close the connection:
    client.stop();
    Serial.println("Client Disconnected.");
  }
}
ผลลัพท์
เมื่อเรา Reset ESP32 จะเห็นว่าใน Serial Monitor พิมพ์ ip ว่าเป็น 192.168.1.115 แล้วถ้าพิมพ์เข้าใน browser จะเข้าไปหน้าเวปได้
ผลลัพท์
สุดท้าย
จบแล้วสำหรับบทความแนวฝึกสอนนะครับ Goal จริงๆ จะเขียนในละเอียดๆ ทำไปเรื่อยๆ เผื่อทำหนังสือบ้าง ที่จริงทางผมชอบทำโปรเจคมากกว่า แต่ตอนนี้ ดูในเวป document ดีๆหายากจังครับ ถ้าใครสนใจจะช่วย หรือ จะมาแจมแจ้งได้เลยนะครับ ผมไม่ห่วงเลยแม้แต่น้อย และ ถ้ามีติดปัญหาอะไร หรือ มีข้อสงสัย อีเมล์ แจ้งเข้ามาได้